If your Shopify checkout still depends on checkout.liquid, scripts or script tags, the migration to Checkout Extensibility is no longer optional, and the work is mostly an audit and a rebuild, not a theme edit. Every customization has to be found, mapped to an app-based replacement, tested on real orders and verified in your tracking. This guide walks through that sequence for operators who run a store with real volume and cannot afford a week of broken checkouts.
TL;DR
- Shopify replaced checkout.liquid with app-based Checkout Extensibility. The Information, Shipping and Payment pages lost checkout.liquid support first, and the Thank you and Order status pages followed.
- The deadlines that matter have passed, so the real question is what your checkout lost and what needs rebuilding.
- Start with an inventory of every script, pixel, app and theme edit touching checkout, then map each to a checkout UI extension, a Shopify Function or a web pixel.
- Test on a live order, not just a preview, and check purchase events, ad platform signals and customer emails separately.
- Publish with a rollback configuration ready, and avoid launching in the final days before a peak sales period.
Table of Contents
- What Checkout Extensibility replaced
- Where the deadlines stand
- Step 1: Inventory everything that touches checkout
- Step 2: Map each customization to its replacement
- Step 3: Build in a draft, not in production
- Step 4: Test on real conditions
- Step 5: Launch with a rollback and a calendar
- Common failure points
- When the migration needs a team
- Our perspective
- FAQ
- Sources
What Checkout Extensibility replaced
Checkout.liquid was a theme file that let Shopify Plus merchants edit checkout markup and inject code. Shopify’s changelog describes Checkout Extensibility as the app-based, upgrade-safe way to customize checkout in its place. Customizations now live in apps and configuration, not in code pasted into the page.
The practical difference is control versus stability. The old model let a developer change anything, which is why checkout customizations broke whenever Shopify improved checkout. The new model runs your code at defined points in checkout. You give up arbitrary page manipulation, and you gain a checkout that Shopify can upgrade without breaking your changes.
Where the deadlines stand
The timeline came in stages, and by now most of it is behind you:
- August 13, 2024: per the changelog above, the deadline applied to the Information, Shipping and Payment pages. Plus merchants could keep using checkout.liquid on Thank you and Order status for a while longer.
- August 28, 2025: according to Shopify’s developer documentation, checkout.liquid and additional scripts were sunset on the Thank you and Order status pages, and script tags were sunset there for Plus stores.
- August 26, 2026: the same documentation lists this date for script tags on those pages for non-Plus stores. Stores still using checkout.liquid are required to upgrade to Shopify’s extensions in checkout.
If you are reading this after those dates and something in your checkout stopped working, a script or customization has probably been switched off. The fix is the same as a planned migration, only done with less time. Check Shopify’s documentation for any later changes, since the platform keeps retiring older mechanisms on a schedule.
Step 1: Inventory everything that touches checkout
The most common cause of a failed migration is an incomplete list of what the old checkout did. Customizations hide in more places than the checkout.liquid file.
Build the inventory from these places:
- The checkout.liquid file itself. Read it line by line and note what each block does: added fields, banners, trust badges, upsell blocks, hidden elements, styling.
- Additional scripts and script tags. Anything added in the order status script box or injected by an app.
- Installed apps. Each app that touches checkout, shipping rates, payment methods, discounts or post-purchase offers.
- Tracking. Every pixel and tag firing on checkout and the Thank you page: ad platforms, analytics, affiliate and email tools.
- Integrations. Anything that reads checkout data, such as an ERP, a fulfillment system or a CRM that expects specific fields or note attributes.
Shopify’s own guidance for editing checkout.liquid is useful even for a retiring file. The developer documentation advises backing up the current code before changes, depending on data and name attributes rather than Liquid drop content, and wrapping customizations in a killswitch theme setting so they can be disabled fast if checkout breaks. Take the backup first, because the code is your specification for the rebuild.
You can also check where a store stands programmatically. Shopify’s changelog entry on a new webhook says API version 2025-04 introduced the checkout_and_accounts_configurations/update webhook, which fires when a merchant updates checkout and accounts configuration. A field in its payload, typ_osp_pages_enabled, indicates whether the merchant has upgraded the Thank you and Order status pages. That helps an agency or internal team that manages several stores confirm which ones are done.
Sort each item into a bucket
For each line in the inventory, ask what it does, not how it was coded. Most customizations fall into five groups:
- Added content or fields: banners, gift messages, delivery notes, custom inputs.
- Look and feel: logo, colors, fonts, layout.
- Business logic: discount rules, hiding or renaming shipping and payment methods, validation.
- Post-purchase experience: Thank you page content, upsells, surveys.
- Tracking: pixels, conversion tags, server-side events.
That grouping matters because each bucket has a different replacement.
Step 2: Map each customization to its replacement
| What the old checkout did | Where it goes now |
|---|---|
| Custom blocks, fields, banners, badges | Checkout UI extensions, delivered through an app |
| Logo, colors, fonts, layout | The checkout editor and branding settings |
| Discount, shipping and payment logic | Shopify Functions |
| Thank you and Order status content | Extensions on those pages |
| Pixels and conversion tags | Web pixels (app pixels or custom pixels) |
Two points trip up most teams.
First, extensions render inside defined slots. They add to checkout rather than rewriting it, so a customization that depended on deleting or rearranging a standard element needs a different design. Often the business goal can still be met, for example through a Function that changes which shipping options appear, but the implementation is not a one-for-one port.
Second, third-party scripts no longer run freely on the page. Analytics has to go through the pixel system, which also means your tracking setup changes, not only your checkout look. Shopify’s upgrade materials also note that not every old customization can be replicated, so you should confirm each custom requirement against current platform capabilities before committing to a rebuild. Where a gap exists, the decision is a business one: change the process, use a different app, or build a custom integration through the APIs.
This is the stage where the work stops being a settings change and becomes engineering. A custom shipping rule, a B2B pricing check or an integration that writes order data to an internal system is software, and it needs to be built, versioned and tested like software. If your store also has wider performance or conversion goals, our guide on Shopify checkout optimization covers how to audit extensions against their effect on the checkout.
Step 3: Build in a draft, not in production
The checkout editor works with configurations. The clean approach is to duplicate the active checkout configuration into a draft, rebuild branding, layout and app blocks in the draft, preview it, and publish only when the draft matches the inventory. Publishing swaps the new configuration in, and keeping the previous working configuration available gives you a path back.
A sensible build order:
- Branding and layout first. Low risk, and it shows quickly whether the checkout reads correctly.
- App blocks next. Reinstall or configure the apps that provide extension-based features.
- Pixels. Recreate each tracking event as a web pixel and confirm the data layer matches what your reporting expects.
- Functions and custom extensions last. These carry the most logic and the most risk, so they get the most testing time.
Keep a written record of every change. When a conversion rate moves a month later, you will want to know what changed and when.
Step 4: Test on real conditions
A preview proves that a page renders. It does not prove that orders, emails and ad platform signals all behave. Test these separately.
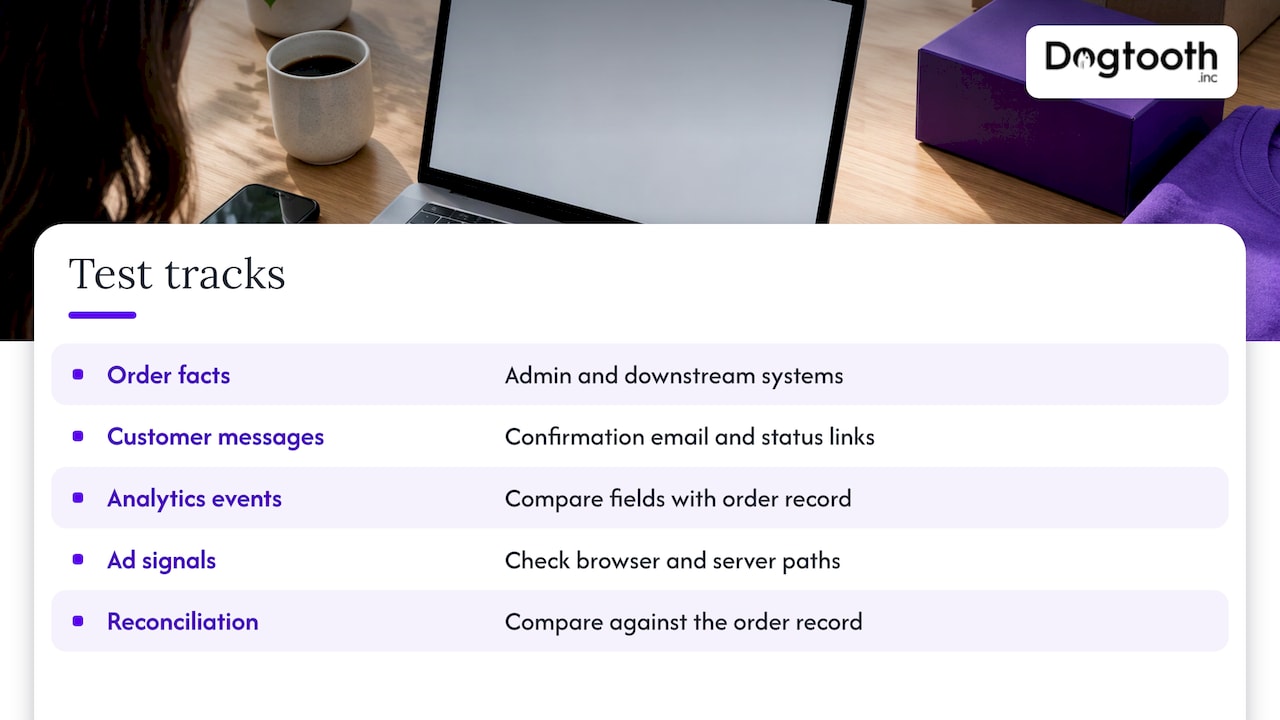
Order facts. Place a live order through each payment method you accept, with a discount code, with each shipping option and with any special case such as international or B2B. Confirm the order lands correctly in the admin and in every downstream system.
Customer communication. Check the confirmation email and any post-purchase messages. Many stores discover a missing field or a broken status link only here.
Analytics events. Follow one order through the whole trail. Compare the transaction ID, item fields, value, currency and coupon across your analytics tool and the order record. Repeat the test with a tagged campaign link so you can see attribution survive checkout.
Ad platform signals. If you send events from the browser and from the server, check each path on its own. When both fire, duplicates inflate your reported results. When one drops, the ad platform learns from an incomplete picture. Shopify’s pixel model is designed to carry these events, so resist the temptation to paste in another script just to make an event appear.
It is also worth keeping two ideas apart. Reported revenue in an ad platform is not profit, and an analytics event is not an order. Reconcile them against the order record, not against each other.
Watch performance too
Checkout is the one page where added latency costs sales directly. Each app that loads an extension adds weight, so measure after publishing, not only before. Our Shopify speed optimization guide covers the storefront side of this. For the storefront pages that precede checkout, are one more option to weigh against app load.
Step 5: Launch with a rollback and a calendar
Timing is as important as the build. Publish well before your busiest period, so the new checkout collects weeks of real orders before peak traffic arrives. If time is short, publish only what you can verify on real orders (branding, app blocks, pixels) and leave complex custom extensions and Functions until after the rush. A half-tested custom Function in the middle of a sale is the costly way to learn about an edge case.
A simple launch pattern:
- Finish the audit and the draft rebuild first, with the draft reviewed against the inventory.
- Publish, then place live test orders and verify every pixel, Function and field.
- Freeze checkout changes for the last stretch before your peak period.
- Keep the previous working configuration available as a rollback.
The same discipline applies to any production cutover. A cloud migration checklist shows how sequencing, validation and rollback planning fit together on larger moves. For platform-level changes, our guide to a safe Shopify Plus migration explains why a scope of work comes before a cutover.
Common failure points
- Missing the Thank you page. Teams rebuild the main checkout and forget that post-purchase scripts, surveys and conversion tags lived on the Thank you and Order status pages.
- Silent tracking loss. Orders still arrive, but a conversion tag stopped firing. You notice when ad platform results drift weeks later. Compare ad-reported conversions against orders in the first days after launch.
- Hidden dependencies. An internal tool reads a note attribute that the old checkout wrote. The new one does not, and fulfillment slows down.
- Porting instead of redesigning. Copying old behavior pixel by pixel rarely works. Start from the business outcome and pick the supported mechanism.
- Skipping the rollback plan. If you cannot revert in minutes, you are testing in production.
When the migration needs a team
A store with a simple checkout and a handful of apps can often do this in-house. A store with custom shipping logic, B2B rules, attribution requirements or integrations into back-office systems should treat it as a software project with scope, owners and a test plan.
Dogtooth Inc. builds and migrates Shopify and WooCommerce stores, and our e-commerce engineering and integrations work covers the code, APIs and tracking that sit behind checkout. Our team is senior-led, ships weekly and stays on after launch, so the checkout is monitored after it goes live, not left alone. For an example of the pace, see our Shopify supplement store that launched in 7 weeks, or read how we think about lifting Shopify conversion rate.
If you want a checkout rebuilt and verified by a team that treats it as its own, tell us about your store on the Dogtooth Inc. site.

Our perspective
Most checkout migrations go wrong before any code is written. The team treats the job as a theme edit, when it is an inventory of everything your business has attached to the moment of purchase over the years: scripts, rules, tags, integrations and a few things nobody remembers adding.
We approach it as a software project. We write down what each customization does for the business, decide whether it still earns its place, and rebuild it with the mechanism the platform supports. Then we verify the result where it counts: on real orders, in the tracking, in the downstream systems.
We run our own operations the same way, with AI in the loop for drafting, checking and reporting and a person approving what ships. That habit of checking before anything goes out is the one we bring to a checkout. Attribution is where it pays off most, because a checkout that works but reports wrongly will quietly steer your ad spend in the wrong direction.
Our advice is to treat the migration as the moment to clean up, not just to comply. Remove what no longer earns revenue, make the tracking trustworthy, and keep a team close after launch.
Chase Weir
FAQ
What is checkout extensibility migration?
It is the move from customizing checkout with checkout.liquid and scripts to Shopify’s app-based extension model. Customizations become checkout UI extensions, Shopify Functions, branding settings and web pixels. The aim is a checkout that Shopify can upgrade without breaking your changes.
Do I need Shopify Plus for Checkout Extensibility?
Shopify’s changelog frames checkout.liquid as a Plus feature, and the extensibility model as its replacement for those merchants. Some capabilities, such as extensions on the information, shipping and payment steps, have been tied to Plus, while the Thank you and Order status pages have had their own schedule for non-Plus stores. Check Shopify’s current documentation for what your plan includes.
What happens to my old scripts and tracking?
Scripts and script tags on the Thank you and Order status pages were sunset on dated schedules, so old tags may no longer fire. Rebuild them as web pixels, then test one order end to end to confirm the events and values match your order record.
How long does the upgrade take?
It depends on how much custom logic you have. Branding and app blocks can move quickly, while custom extensions, Functions and integrations take longer and need testing time. Plan the audit first, since it sets the real scope.
Can I roll back if something breaks?
Yes, if you plan for it. Build in a draft, keep the previous working configuration available when you publish, and be able to disable customizations quickly. Test live orders right after publishing, while a rollback is still easy.
Sources
- The checkout.liquid theme file is being deprecated (Shopify changelog)
- Best practices for editing checkout.liquid (Shopify developer documentation)
- New webhook to track updates to checkout and accounts configuration (Shopify changelog)